Staple with a twist

Who doesn’t love Shepherd’s Pie.  A simple, cheap and filling family meal that doesn’t last long in our household.

I find, though, that the mashed potato topping whilst a hit with teenage boys, is too heavy for me for dinner, and not needed for hubby’s waistline!  The other night, with an ailing cauliflower in the fridge, I decided to top with mashed cauliflower.

One of my son’s is completely allergic to vegetables (not really but anything green or not cheese, meat or chocolate is not worthy of the plate!).  He loved this and as you can see from the photo there was not much left after dinner.

Shepherd’s Pie with cauliflower mash topping

Ingredients

  • 1 head cauliflower, trimmed and chopped coarsely
  • 40g butter
  • ¼ cup Parmesan, grated
  • 2 tablespoons milk
  • 800g beef mince
  • 1 tablespoon olive oil
  • 1 onion, diced
  • 1 carrot, peeled and chopped into small pieces
  • 2 tablespoons stock (I used 2 beef stock cubes and a dash of water)
  • 2 teaspoons Worcestershire sauce
  • 1 tablespoon tomato paste
  • 2 teaspoons thyme

Cook the cauliflower until completely tender, drain and transfer to food processor.  Puree with the butter, parmesan and milk until smooth.  Add salt and pepper to taste.  Set aside and keep warm.

In a saucepan fry the onion in oil, add the mince.  When the mince is partially cooked add the carrot and cook until tender.  Add stock, Worcestershire sauce, tomato paste and thyme.  Simmer for 5 minutes or until the liquid reduces slightly, but the mince is still covered.  Season with salt and pepper.

Transfer the mince to a casserole dish.

Spread the cauliflower mash over the top of the mince.

Place under the grill for about 3 minutes or until you see some brown patches appear and it starts to bubble.

Remove from the oven and serve.

Copyright © 2020 Food Family Love. All rights reserved.

How to pasta time

I have been AWOL. It’s been challenging for me to stay positive and not get caught up in the anxiety and nervousness that is replacing good sense at the moment.  I rarely watch the nightly news, now I absolutely do not have it on – it’s too much!

I’ve had an internal struggle about writing my blog…up until now I’ve not felt right about it. But I thought a bit of light news might be a welcome relief. We could all do with a bit of a deviation from our new normal.

So, here is my blog for the week.

Who has been buying up all the pasta? I haven’t seen any for weeks, so I hope you have some in your pantry to cook this! This recipe is delicious, easy to make and uses items that most would have in their pantry.  It’s great for dinner and the left overs are fantastic for lunch the next day.

Stay safe everyone, be kind and most of all stay positive.

Be mindful.  Be grateful.  Be positive.  Be true.  Be kind.

Spaghetti Carbonara

Serves 4

  • 1 cup pancetta, chopped bacon or bacon bits
  • 2 tablespoon olive oil
  • 1 packet spaghetti
  • 8 egg yolks
  • 2 cups parmesan cheese, grated and more for serving
  • Black pepper
  • Salt

Place the spaghetti in salted boiling water to cook until al dente. 

Meanwhile, whisk egg yolks in a large bowl until smooth.  Stir in parmesan and black pepper (to your liking).

Heat diced pancetta, bacon or bacon bits in olive oil over medium heat until crispy.  Remove from the heat and set aside.

When pasta is al dente, drain, keeping some pasta water.  Add the pasta to the pan with the pancetta, bacon or bacon bits.  Add some reserved pasta water and mix in.  Add egg mixture and stir for 1-2 minutes.  Cook with residual heat from the pan – do not put back on the heat as the egg will cook.

Serve up generous bowls full, sprinkle with more parmesan and black pepper.

Copyright © 2020 Food Family Love. All rights reserved.

Stock Standard

With all the hype at the moment about people stockpiling toilet paper, tissues, paper towel and tinned food in case of a zombie invasion (coronavirus) I thought it timely to blog about a productive way to make the most of everyday food items, not wasting a bit of the food we eat. The added bonus here is that this stock is jam packed full of nutrients.

If we have a roast or cook a whole fish the bones never ever go to waste.  They are always turned into a stock that I freeze.

You have probably heard of bone broth.  The difference between bone broth and stock is that bone broth is boiled for a long time, while a good stock can be made in about 4 hours.  Bone broth and stock can be used interchangeably.

I call mine stock, though it is technically a bone broth, in modern terminology.

I usually boil our stock for a long time to get the most out of the bones and other ingredients.  Simmering bones for long periods assists in releasing nutrients such as collagen, gelatin and calcium.  These are all great nutrients to support skin, joint and gut health. 

Chicken bone broth/stock

  • 1-2 chicken carcasses
  • 2 onions chopped roughly, including onion skins
  • 2 carrots, unpeeled and chopped roughly
  • 2 celery stalks, chopped roughly (use the leafy part as well for added flavour)
  • 2 table spoons apple cider vinegar
  • 1-2 egg shells (increases the calcium level in the final stock)
  • 1-2 handfuls of fresh thyme and oregano
  • 2 tablespoons salt
  • 1 tablespoon peppercorns (not cracked)
  • 3 bay leaves
  • left over vegetables if you have any (not necessary)

Place all the ingredients in a large stock pot or in a slow cooker and cover with water.  Bring to the boil and then simmer. 

Simmer for at least 24 hours.  I usually leave in the slow cooker for 72 hours, on low and add more water as/if needed.

Once you have simmered the bones for the desired time, remove the bones and strain the stock.  Allow to cool before decanting and refrigerating or freezing. 

A great tip is to freeze the stock in ice cube trays.  Once frozen, put them in a ziplock bag in the freezer, ready to use as needed.

Copyright © 2020 Food Family Love. All rights reserved.

OK Poke (pron. pok-ay)

This week we were late home because we had parent-duty at a school function.  Instead of reaching for the take-away menu upon returning home, I decided to try my hand at a Hawaiian-inspired poke bowl which are on-trend currently.  Right, so I’ve never actually been to Hawaii (bucket-list) but I’ve eaten plenty of poke bowls.

I’m always uncomfortable ordering a poke bowl as I never quite know how to say it properly.  Mr Google has informed me that it is ‘po-kay’ not po-kee or poke (as in “he poked me with a stick”).

Poke bowls start with raw fish, usually tuna, served with rice and salad and a dressing.  I love the colours and the way that each item in the bowl is placed separately so you can mix it up.

I had rice and salad and some ocean trout in the fridge.  This is what I came up with.

Ocean Trout bowl

Serves 2

  • 2 pieces ocean trout (salmon or tuna could be used)
  • 2 handfuls baby spinach leaves
  • 8 snow peas sliced
  • 1 avocado
  • 1 ruby red grapefruit, peeled and chopped into bite size pieces
  • 1 x 125g brown rice cup
  • 2 handfuls dry slaw (pre-packaged)
  • Sesame seeds to serve

Marinade for the fish

  • 1 teaspoon olive oil
  • 1 teaspoon paprika
  • 1 teaspoon cumin
  • ½ teaspoon cayenne pepper
  • Dash of garlic powder
  • Salt and pepper to taste

Dressing

  • 3 tablespoons olive oil
  • Juice of 1 orange
  • Salt and pepper

Mix the marinade in a bowl.  Place the fish on a plate and cover in marinade.  Let the fish marinate for 30 minutes.

Assemble the salad by placing each item in a bowl, in separate piles.  Drizzle the dressing over at this stage.

Heat a frying pan with oil over medium heat.  Add the fish and cook to your liking (about 4 minutes, flip and cook on the other side for about 2 minutes.  Don’t overcook).

Zap the rice in the microwave according to the instructions.  Let it cool slightly.

Pop the rice and then the salmon to the bowls.  Sprinkle with sesame seeds. Serve with extra dressing on the side for those who like more!

Shopping list

  • 2 pieces ocean trout or salmon
  • Baby spinach
  • Packet of snow peas
  • 1 avocado
  • 1 ruby red grapefruit
  • 1 orange
  • 1 rice cup (they usually come in packets of 2)
  • 1 packet dry slaw

Copyright © 2020 Food Family Love. All rights reserved.

Soup for dinner

I’ve struggled to get my creative juices flowing this week.  I’m putting it down to the departure of number one son back to north Queensland for another year as a jackaroo and the realisation that I won’t see him until Christmas.  We all miss him dreadfully, but it’s time to put my big girl pants on and show up. 

Number two son is in his final year of school so this year’s main focus is keeping him healthy, fit, focussed and calm.  As with any teenager, finding healthy dinner options is sometimes challenging.  I have been lucky that my boys will give most things a try.  They are very definite in their likes and dislikes, but only after they’ve given it a red hot go.

When I first served this soup for dinner, it was met with some quizzical looks by the boys and the hubby for that matter.  After trying it, though, they were impressed and it has become a staple in my repertoire.

Roasted tomato, carrot, capsicum and fennel soup with fish

  • 2kg tomatoes quartered (or 5 tins 400g canned tomatoes)
  • 4 cloves garlic, peeled, left whole
  • 3 carrots, ends removed and cut in half
  • 1 red capsicum, seeded and roughly chopped
  • 1 small fennel, ends trimmed and roughly chopped
  • ½ cup olive oil
  • 1kg white fish (barramundi, cod), cut into bite-sized pieces
  • 2 tablespoons basil, chopped roughly

Preheat the oven to 200C (180C fan-forced).  Line a roasting pan with baking paper.

Put the tomatoes (only if using fresh tomatoes), garlic, carrot, fennel and capsicum in the roasting pan, drizzle with olive oil and season with salt and pepper.  Cover tightly with foil and roast for 1 ½ hours until vegetables.  At this time, remove the foil and allow the vegetables to roast for a further 30 minutes uncovered until they become a little caramelised.

Transfer the vegetables into a blender.  If you are using tinned tomatoes, add them at this stage.  Blend until pureed.  Transfer the mixture to a saucepan and bring to the boil.  Add the fish and reduce the heat to low, cover and cook for 5 minutes, or until the fish is just cooked through.

Serve topped with chopped basil.

For the teenagers, I usually add some garlic bread or toasted sourdough.

To love

Valentine’s Day is all about celebrating love. To love and to be loved is an amazing thing, something not to be taken for granted and something to honour and cherish.

When our boys were younger and complimented me on a meal that they enjoyed, I’d always say to them that the reason it tasted so good was because of my secret ingredient. Eagerly they’d ask what that was. My reply every time…………love.

This week, I wanted to cook something in memory of a much-loved friend who sadly passed away a few weeks ago. Despite begging for the recipe she never shared her secret.

I’ve tried many versions of these light shortbread biscuits and think I’ve come up with a version that would make M proud.

M, I loved you and miss you.

Mary’s Hearts – shortbread biscuits

Ingredients

  • 150g plain flour
  • 100g butter
  • 50g sugar
  • 1tsp vanilla essence

Chop the butter and mix with the flour by hand rubbing into small crumbs.  Add sugar and work together to form a firm dough.  Wrap it in glad wrap and rest in the fridge for 20 minutes.

Roll out on a floured bench, until 5mm thickness.

Cut into heart shapes and bake on a dry baking tray for 20 minutes at 180C.

Dust with icing sugar and cool on a cooling rack.

Makes around 12 biscuits (but there will probably be none left for the cookie jar if your house is anything like mine).

Best fresh out of the oven with a cup of tea!

Figalicious

Figs are delicious at the moment, sweet and juicy, and we’ve been devouring them by the dozen!  They are highly nutritional and provide good minerals including potassium, calcium, magnesium, iron and copper and are a good source of antioxidant vitamins A and K. 

I sound so knowledgeable!  Who knows what all that actually means, but I do know that they are divine and very versatile.

You can use figs on a cheese platter fresh, in fig jam, in a fig tart, with roast meats, in chutney and salads. 

This week I wanted to feature the humble fig and made a filling but tasty salad to champion them.

Fresh fig, goat’s cheese and maple walnuts

Ingredients

  • 125g fresh rocket leaves
  • 100g goat’s cheese, crumbled
  • 6 fresh figs quartered
  • 50g walnuts, toasted
  • 6 tablespoons walnut oil
  • 2 tablespoons red wine vinegar
  • 1 tablespoon maple syrup, and extra for toasting walnuts

Mix the oil, vinegar and maple syrup in a bowl, season with pepper and salt.  Set aside.

Line a baking tray with baking paper.  Put walnuts in a bowl and drizzle with maple syprup.  Toss and coat well.  Spread the walnuts on the baking tray and place in oven (180C) and toast for 10-15 minutes until crisp.  Remove from the oven and let cool.  When cool break up and roughly chop.

Arrange rocket leaves on a platter, top with figs and goat’s cheese.   Drizzle the salad dressing over the salad, then add the walnuts.

Serve chilled with a glass of rose and crusty bread.

Serves 4.

The never-ending lunch box challenge

My sons have never enjoyed sandwiches – too soggy, too boring……the list of complaints goes on! This has left me with the ongoing battle of finding something else of interest that they will eat at school.

I’ve given them left over pasta, salads, soup in a thermos in winter, muffins, cold sausages, anything that is easy, quick to eat and appetizing.

I’ve loved the school holidays – no lunches to prepare! But here we are again (I’ve only got til September as my youngest is in his final year).

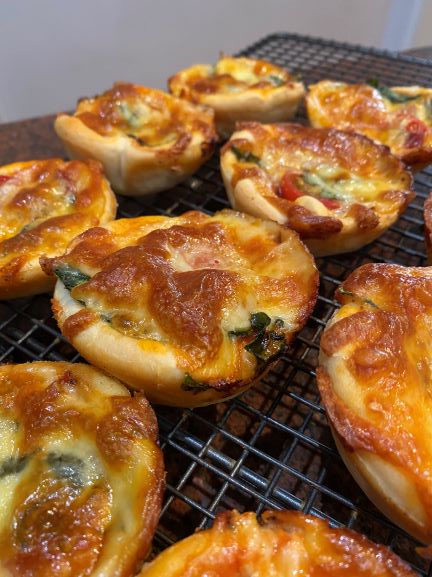
Mucking around over the holidays perfecting pizza bases for Friday nights-in, I thought that a mini pizza cooked in a muffin pan might work. Pizzas are a favourite. Who doesn’t like melted cheese? They can be served at room temperature, so no heating up at school required and you can top them with anything you fancy.

I am heavy-handed with cheese as my boys love melted cheese.

Oh, and I found the most amazing time-saver if you don’t want to make your own pizza dough. Most grocery stores stock pizza dough balls! The ones I found you simply thaw then shape. I’ve even stumbled upon gluten free dough balls. Simple.

The biggest challenge I had when I first made these was to safely get them into the lunch box before my sons and husband devoured them in the name of product testing!

Ingredients

Pizza dough

  • 7g sachet dried yeast
  • 1 cup luke-warm water
  • 2 2/3 cup plain flour (extra for dusting)
  • 2 teaspoons salt
  • 1/4 cup olive oil

Whisk yeast and water in a jug. Stand for 5 minutes until frothy.

Place the flour and salt in a large bowl. Make a well in the centre and pour the yeast mixture and oil into the centre. Using your hands (this is the fun bit!) mix the dough until it comes together and is smooth. Turn it out onto a lightly floured surface and knead for a few minutes.

Place dough in a lightly oiled bowl and cover with glad-wrap. Set aside in a warm place for 30-60 minutes to allow it to double in size.

Turn the dough onto a lightly floured surface and knead for another 5 minutes or until smooth. Divide and roll out the dough. Sprinkle some flour on the bench before rolling to make sure the dough doesn’t stick.

This recipe makes enough for about 24 mini muffins – I usually freeze half of the dough for another time.

Doughy tips

  • To make the dough rise faster, fill the sink 1/3 full with warm water and sit the dough in the bowl in the water for it to rise.
  • To freeze dough, let it rise then divide into the size for a single base size, wrap in glad wrap and freeze. When you want to use it thaw in the fridge overnight.

Ok, so you have your pizza dough rolled out (about 5mm thick). Using a 7cm round cutter (I used our trusty water tumblers), cut 12 rounds from the dough.

Grease a 12-hole muffin pan.

Line the holes of the muffin pan with the dough rounds. Push into the pan to come 3/4 up the side of each hole. You might need to experiment with one first to ensure the sizing is correct. If not the right size, re-roll and cut.

Pizza fillings

  • 1/4 cup passata
  • 1 1/4 cups grated mozzarella
  • 100g chopped chorizo
  • 12 cherry tomatoes, halved
  • small handful of baby spinach leaves
  • 12 basil leaves
  • 1/4 teaspoon mixed herbs
  • salt and pepper to taste

Spread passata over the base and sides of the pizza bases. Divide chopped chorizo, tomatoes, a few spinach leaves, herbs, salt and pepper then top with the cheese (add as much or as little to your taste).

Bake in pre-heated 200C (180C fan-forced) oven for 15-20 minutes or until the cheese is golden and melted. Stand in pan for 5 minutes before turning out.

Remember – toppings can be anything that you usually put on your pizza.

Have fun experimenting!

For the love of chocolate

The saying “the way to a man’s heart is through his stomach” is definitely true in our case. When we were dating, many moons ago, every second weekend I’d pack my car and head to the country, in the Friday peak hour traffic, to spend time with my man (worth the effort as he’s hubby now!).

Early in our relationship I realised that my husband is a serious chocoholic. So every Thursday night I’d bake him something chocolate. The winner was my chocolate mud cake – he LOVED that! Friday I’d pack the freshly baked goodies and head off, always included was a bottle of Tanqueray as we both love it. Gin brought us together – long and possibly not that interesting a story for anyone else – but here we are nearly 24 years later!

I’ve made many different versions of mud cake over the years and the one we have settled on as serious family favourite is this flourless chocolate cake.

It’s gluten free folks, so those with an intolerance can enjoy this decadent dessert.

Flourless chocolate cake

Ingredients

  • 200g butter
  • 200g dark chocolate
  • 6 eggs, separated
  • 1 cup caster sugar

Preheat oven to 180C.

Grease and line a springform pan (approximately 26cm).

Put the butter and chocolate in a double boiler (you can use a bowl that sits snugly into a pot of water – don’t put too much water in the pot that it boils over the sides – the water should not reach the bottom of the bowl). Stir the mixture gently until it is fully melted. Allow to cool.

Beat the egg yolks and sugar until thick. Add the cooled chocolate mixture and stir by hand until fully combined.

In a clean glass bowl beat the egg whites until stiff peaks form. Place half the egg whites into the chocolate mixture and fold gently until combined. Repeat with remaining egg.

Pour the mixture into the prepared springform pan and bake for 45 minutes or until set in the middle. Allow the cake to cool and firm up in the pan.

NOTE – the cake will fall back and may crack on the top, but that’s what it is supposed to do!

When the cake has cooled, gently turn out and remove the baking paper. Place on a serving platter. Dust with icing sugar and serve with cream and fresh berries.

Green thumbs

One of my husband’s many talents is his green thumb. He is a dedicated orchid grower, but he particularly loves to grow things that we can eat. Our garden is currently bursting with corn, chillis, cherry tomatoes, basil, and eggplants, all watered by hand with a watering can during this drought and current water restrictions.

Eggplant (well-oiled) is fantastic to throw on your BBQ or char-grilled for 2-3 minutes on each side until lightly charred and tender. Keep a lid on while cooking so they don’t dry out. Put the BBQ’d eggplant in a salad with baby bocconcini, chopped tomatoes and basil with a drizzle of olive oil and balsamic vinegar.

This week we have so many eggplants ready to eat, so I thought I’d try my hand at baba ganoush which is a Middle Eastern eggplant dip, served with pita bread or alongside barbecued lamb, with some veggies.

It doesn’t look that sexy and mine has an orange tinge as I used smoked paprika to add a huge burst of flavour. The taste of eggplant is not everyone’s cup of tea, but a good way to use eggplants when in season, particularly if you grow them. And an added bonus it is actually a healthy snack option!

Ingredients

  • 2 large eggplant
  • olive oil
  • 2 cloves of garlic crushed
  • 1 tablespoon tahini
  • 1 teaspoon cumin
  • 3 tablespoons smoked paprika (add more or less depending on taste)
  • extra virgin olive oil
  • 2 lemons
  • salt (optional, to taste)

Preheat the oven to 180C.

Cut the eggplants in half lengthways after removing the top. Score the flesh sides in crisscross, ensuring you don’t pierce the skin. Brush top with olive oil. Place on baking sheet lined with baking paper. Bake flesh-side facing up for 45 minutes or until soft. Note – I tried baking flesh side down but the juices stay in the vegetable if baked flesh side up.

Remove from the oven and allow to cool. Once cool enough to touch, use a spoon to scoop the eggplant from the skin. Be sure not to take any skin during this process

Peel the garlic and place in a bowl with the tahini, cumin, olive oil, and eggplant. Squeeze the lemons into the mixture. Mix enthusiastically by hand, adding smoked paprika to taste. A little salt may be needed to lift the taste.

I tried mixing both by hand and with a mixer. For my taste, the mixer blitzes the mixture too much. It is more interesting if it is a bit chunky.

Transfer to a bowl for serving.

Toast some Lebanese bread and break into small pieces. Serve as a dip with drinks.